Copyright © 2007 Lion Precision. www.lionprecision.com
Summary
This TechNote describes converting the ECL101 between Master and Slave configurations.
ECL101 Master/Slave Configuration
Master/Slave Operation
Static Warning:
Electronic components can be damaged by static electricity.
When possible, precautions should be used when working with the PCB outside of the case.
• Work on a metallic or antistatic surface
• Touch a grounded surface before removing the PCB
• Avoid static generating activities around the PCB such as dispensing cellophane tape, using plastic “solder suckers,” or any other activity which rubs nonconductive materials together.
When two sensors are simultaneously measuring the same target the drivers must be synchronized to prevent interference between the two channels. Synchronization is accomplished by configuring one sensor as a Master and up to eight other sensors as Slaves.
Synchronization can only be accomplished between sensors with the same excitation frequency. This frequency is dependent on the probe and range. Systems using the same or similar probes and ranges will have matching excitation frequencies. If using significantly different probes and/or ranges, contact Lion Precision to determine the excitation frequencies of the drivers.
Configuration Procedure
- Remove the electronics from the case:
- Remove both I/O connectors and the Sync connector’s nut and washer.
- Firmly grasp the textured sides of the front panel assembly.
- Pull the front panel assembly away from the housing while squeezing and rocking the front panel assembly.
- Remove PCB from the case.
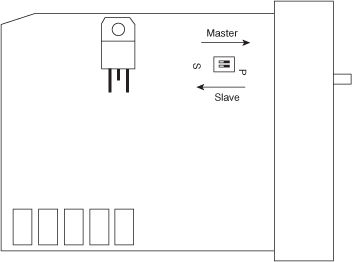
- Locate the Master/Slave dip-switch in the upper right corner of the PCB
- To configure as a Master, slide both switches to the right as indicated in the drawing below.
- To configure as a Slave, slide both switches to the left as indicated in the drawing below.
- Reinsert the electronics into the housing and reassemble by reversing step 1.
- Connect Sync cables between all synchronized sensors (1 Master, 8 Slaves max.)
Note: A slave will not operate unless connected to a Master.